

How To Repair A Warped Hoosier Cabinet Sliding Tabletop
It gets cold in winter up here in Northern BC Canada, simply a gal'due south gotta have hobbies to keep herself busy when the weather condition is too adverse to be outdoors. So I joined the BYC NYD Hatch-along, set up my eggs and then realized that I was going to need somewhere to put the hatchlings one time they arrived! OMG! After a fleck of brainstorming I came up with some brooder plans using recycled materials that I had hoped would run into my brooder wishlist:
- must keep peeps safety from other pets in the house (dogs and cats)
- must be attractive to look at since its in the house
- must be useful/multipurpose when non being used as a brooder
- must be easy to clean
- must be inexpensive to build (if I weren't on a upkeep I'd just get buy one!)
- must allow circulation yet keep out drafts
The results, I recall, speak for themselves and the full toll was a mere $25 as I recycled or plant free almost everything except the hardware!!
Here's how I did it.
Earlier in the yr I had acquired some old kitchen/bathroom cabinetry from a local 'freecycle' site. I put most of them to good use in my mudroom, but at that place were 2 cabinets left - 1 that needed repair on the base and one that had just a partial door and open up shelves where it had butted up against another cabinet. In contemplation of my brooder I decided I'd upcycle these to build an indoor chiffonier that looked similar furniture and could exist used as a recycle centre/potting demote or whatever I fancied, when not in use as a brooder!
I started with the base chiffonier. This unit of measurement had quite a few holes in the bottom so I removed the old and replaced it with a flake piece of plywood, I added some other piece of plywood to the back, and repaired the vertical piece (between the doors) as it needed to exist re-glued. I then built a platform for the chiffonier to sit on using 1x3 dimensional lumber and added 8" legs cut at an bending in a simple shaker mode.
That provided me with the base unit. This was an old sink base (hence the holes in the bottom) so it had no drawers, but it had a panel which I removed in gild to create a wire 'vent' for air apportionment. I debated turning the whole unit of measurement upside downward to use the panel as a point to place a pull out tray, but opted non to every bit I didn't want my lilliputian peeps on wire. At this point, I as well decided that the existing doors would be removed and used for something else and in their identify I would build door frames to fit inside the door openings to which I would utilise wire and a removable plexi-glass panel to go along drafts out during cold months (see finished photo of doors below).
The side by side job was to figure out what to use for the cover/countertop. I wanted something that I could open, at to the lowest degree partially, to enable cleaning, adjusting of the rut lamp or what-take-you. Every bit I pondered this next step I recalled an old table out in the garden shed - the top had come autonomously and warped a fleck, merely it was a harvest table and then had 2 hinged sides. I figured I could attach the back portion of the table tiptop upside downward to the base unit while allowing the front end portion to elevator for admission. I even kept the original hinges/screws which are from the early 1900s. Cool, eh! The top needed to be sanded and re-stained, including the underside of the hinged front portion, and I just happened to have leftover stain from another project.
The adjacent step was the upper cabinet. I started by remove the door and the panel on the front end which left a really ugly edge total of staple holes. Obviously I would need to put trim around it at some betoken, but before we got in that location I had to remove the old shelf liner. I kinda liked it, but it was in crude shape so off it came leaving me with a rough, only very sturdy set of shelves, which, when placed on the base cabinet suddenly transformed the unit into a 'hoosier' manner cupboard! Ta da!
With the basic structure completed, the next stride was a coat of paint in 'buttermilk' colour, which I had from a previous projection. I sanded any areas that needed it and and then started painting. Below, yous run into the base unit painted and a partially painted upper cabinet in identify to get an idea of how it would look. I as well distressed the finish and rubbed the stain colour over information technology to darken the wood. I similar that 'shabby chic' look.
I and then congenital the wood frame for the doors using the same 1x3 lumber used for the base platform. I stapled 1/two" hardware cloth to the inside of the doors and the vent and and then applied a trim piece then in that location were no precipitous wires poking out. I'g still debating whether I want to build wire doors for the meridian two shelves to match the bottom. I also cut 2 pieces of plexi-glass to insert on the outside of the doors. Since this unit volition reside in my mudroom, it will be subject area to drafts every bit I let my pack of hounds in and out on a regular basis; consequently, I don't want the peeps to feel this draft so this was an piece of cake solution that can be removed when the conditions improves. The plexi is held in with four as placed pocket-sized round head screws that you barely notice. Of grade I added some hinges and knobs as well. The doors don't hang perfect, but that's okay since it'due south supposed to look old anyhow.
After painting, I needed something in the lesser that would be easy to go along clean. I wanted a tin tray to fit the surface area, merely that proved too expensive to purchase/have made and I kept an eye out at the transfer station for any pieces of tin, but none presented themselves so I'll go along looking. In the acting, I opted to employ peel/stick flooring tiles as they are inexpensive and easy to cut/apply. I will circumspection, however, that they must require time to cure and properly adhere as I put them in and once the brooder lamp heated upwardly they all fell off, viscid side up, essentially creating the equivalent of chick fly paper! Notation: no chicks were harmed in the making of this brooder 
The only affair left to practice later on that was add a hook for the heat lamp, add together shavings, ensure that the temperature was sufficient and add together chicklets!
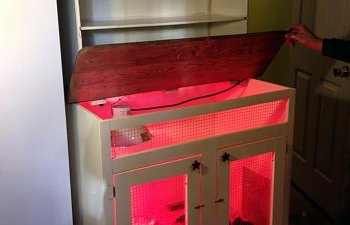
I think the finished production looks pretty skilful. The babies seem to like information technology too! Please notation the photos do not show the upper cabinet completed since I needed to get the hatchlings in and took pics before completion. I all the same demand to cease some other coat of pigment and add the trim (and perhaps doors to the upper ii shelves) as well equally reset the flooring tiles that didn't stick, but you go the idea!
As an bated, the elevation shelving unit can exist removed to use just the bottom cabinet (every bit shown below). These photos prove the hinged top propped a fleck because I didn't have the right sized bit to drill the pigsty for the lamp so I had it gear up temporarily. I too plan to add together an attached thermometer inside by the heat lamp and I accept plans for a removable roost to add in a couple of weeks!
Note: I was anxious to go it done since it did take a chip longer than anticipated and chicks were already hither waiting in a guinea squealer cage until I was washed, so I did skip a few steps such every bit filling spiral holes on the cabinet forepart/sides, but I tin go back and do that after when this brood is out in barn come leap.
-
11.jpeg

Source: https://www.backyardchickens.com/articles/ravenwood-acres-upcycled-hoosier-brooder.64695/
Posted by: beadlescohnes.blogspot.com
0 Response to "How To Repair A Warped Hoosier Cabinet Sliding Tabletop"
Post a Comment